Looking to try your hand at indoor gardening and want an easy project to start with? Interested in growing your own microgreens as a nutritious addition to your diet? Yep — you’re in the right place!
Growing microgreens has gained popularity in the last few years with a wide range of people. It is a simple, straightforward project to take on when you have the right supplies and start with easy plants. Easy to grow, and require little care, within a couple of weeks you’ll be able to reap the rewards of your work, harvesting tasty little plants.
What are Microgreens?
While most people are familiar with sprouts — very young plants from newly germinated seeds — fewer people are familiar with microgreens.
Simply put, microgreens are the older, more sophisticated cousin to sprouts. Unlike sprouts grown without any growing media and eaten roots and all, microgreens are grown in a substrate, allowed to grow until they develop true leaves, and then harvested at the base and eaten.

Why You Should Grow Microgreens
Microgreens started as garnishes on fancy dishes in high-end restaurants, over time gaining popularity and showing up on the windowsills of trendy urbanites and health-conscious millennials. The truth is, though, microgreens have some unbeatable unique qualities, and they deserve much more credit than simply a new trend or fad.
- They are small but mighty! Packed with flavor, a small amount of these guys amps up the taste in dishes, cutting down on the need for salt or other dried seasonings.
- Their nutrient content is concentrated compared to mature plants, providing more health benefits.
- They are incredibly easy to grow. Microgreens don’t require the same skills and supplies as growing full-sized plants, making them a fantastic way to delve into indoor gardening.
- They are quick. In just a couple of weeks, the powerhouse plants are ready to harvest.
Growing Conditions
All plants need sunlight and water to grow, and microgreens are no exception. Due to the exceptionally short growing period for these dynamos, there really isn’t a need to worry extensively about their growing conditions. It is helpful, however, to keep them in a spot where the temperature is comfortable.
Sunlight — Edible plants grow best when they are placed in what we call “full-sun” spots. Indoors, they like areas where they can receive 10-12 hours of bright sun. East-facing windows provide the most sun exposure, followed by south and west. If your home doesn’t get enough sunlight, your plants will grow spindly and lack flavor. Remember, you can always supplement with LED lights if needed. 😉
Watering — A key part of growing microgreens is proper watering. Aim to keep the growing media moist without waterlogging the potting soil, causing mold and fungus to grow. Use a spray bottle to water, especially before germination, to prevent disrupting seeds. Bottled spring water, well water, and rainwater are the best sources, but you can use tap water as long as you don’t own a water softener.
Temperature — Seed germination and plant growth are optimal when temperatures are between 72 °F and 85 °F. During the cooler months, keep microgreens away from leaky window drafts or doors that are frequently opened and closed. One of the best places to grow microgreens is on top of the refrigerator if there is enough sunlight.
Supply List
It doesn’t take much to start a tray of microgreens — a container or two, a substrate to hold the seeds, and the seeds themselves. How much money you invest depends upon your budget and whether you see this being a long-term venture or not.
My tip? Start small and cheap. See if this is something you enjoy doing before putting a bunch of money into it. You can always upgrade later on if you want. Our recommended microgreens grow light.
Containers
What you grow your microgreens in is completely up to you. The only requirement of the container is that it’s able to hold potting soil and seeds. A bonus is if the container has a clear lid! Some people purchase seed trays specifically for germinating, and others use whatever they have lying around at home. Wide, shallow clamshell containers from the market that hold salads, fruit, or cupcakes are perfect.
Growing Media
Next, you need something to fill the containers with. The most popular choice for growing media is potting soil. It’s readily available and inexpensive. If you’re looking for an environmentally friendly alternative, coconut coir is a great option. Growing media holds moisture, it allows air to hang out in the space around the roots, and it holds the seedlings upright as they grow.
Organic seeds
Purchase seeds from a dependable source, or use leftover seeds from a previous gardening year if you have them. Growing microgreens is one of the few times I firmly recommend choose organic. Conventional seeds are often treated with fungicides to prevent damping off during germination. This isn’t a threat when growing mature plants since the chemicals have time to degrade. But with microgreens, the growing window is so short it increases the chance of having fungicide residues on the harvested, young plants.
Planting Instructions
Now that you’ve gathered all of the needed supplies, it’s time to get your hands dirty!
- Start by moistening your growing media with some room-temperature water. You want it to hold together slightly without being able to squeeze water out of it when you grab a handful.
- Using your hands or a plastic cup, add the pre-moistened media to your containers, filling them at least an inch deep.
- Sprinkle your seeds liberally across the top of the potting mix.
- Gently press the seeds down with your hands, making sure they have good contact with the soil. They don’t need to be completely covered.
- Mist gently with water from the spray bottle.
- Cover with the lid.
- Set the container in a spot where it can stay warm.
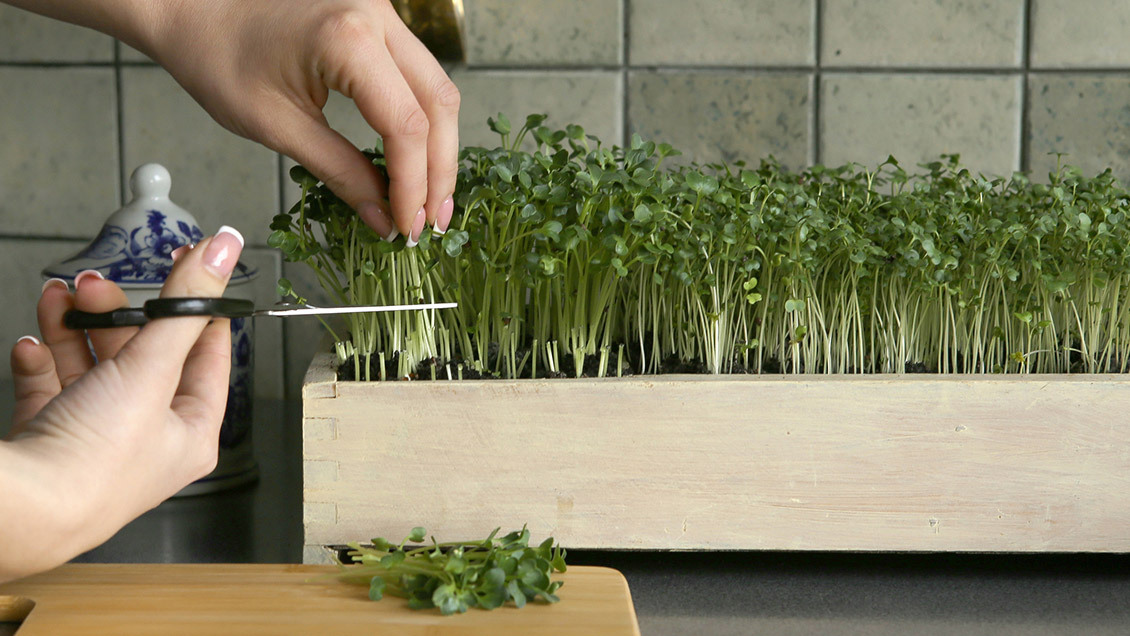
Harvesting
After your seeds germinate, you should have microgreens ready to eat in about two to three weeks. Observe your little plants. When you see the first set of “true leaves” form and unfurl, they are ready for harvest.
To harvest, use a clean part of sharp scissors to cut plants at the base, just above the potting soil. Do not pull them out of the soil since this pulls up the root system too.
Easiest Microgreens to Grow
As I’ve said a couple of times already, growing microgreens is an easy process. But if you’ve never grown plants before and are looking for the easiest of easy, try your hand at pea shoots, mustard microgreens, or radishes.
Pea Shoots
Pea shoots are packed with vitamins, antioxidants, fiber, and protein. Full of Vitamin A and Vitamin C, they make a nutritious addition to salads and your favorite stir-fry.
Best Varieties to Grow: Any common garden, snow, or snap pea variety.
Days to Harvest: 10 to 14 days.
Mustard Greens
Mustard greens are also packed with high levels of antioxidants, include vitamin A and vitamin C. They also contain impressive amounts of fiber and beneficial phytonutrients. These microgreens have a sweet-hot flavor zestier than mature mustard greens.
Best Varieties to Grow: Green Wave, Florida Broadleaf, Osaka Purple, Red Giant, Ruby Streaks, and Southern Giant Curled.
Days to Harvest: As little as 8 – 10 days, depending upon the variety.
Radishes
Radishes are a rich source of phytonutrients, minerals, vitamins, and beneficial antioxidants. The brightly colored microgreens have a peppery taste similar to mature radish bulbs.
Best Varieties to Grow: Japanese Daikon, Red Arrow, Sango, and Triton.
Days to Harvest: 10 to 12.
Microgreens to Avoid
To give you a fair warning, some plants are more difficult to grow as microgreens than others. In general, smaller seeds are more cumbersome to work with than plants with bigger ones. Also, some plants — arugula, basil, brown mustard, chia, and flax, to name a few — have mucilaginous seeds. Once wet, these seeds produce a gel around themselves as protection, keeping them hydrated and in place. It’s a survival mechanism to help during drought, but it makes them more challenging to grow as microgreens.
Latest articles by Amanda Shiffler (see all articles)
- Propagating Indoor Plants With Cuttings - March 17, 2022
- Indoor Gardening: The Many Benefits of Houseplants - May 29, 2021
- Understanding Hidden Hunger - May 29, 2021
Amanda Shiffler
Most comfortable with soil under my fingernails, my enthusiasm is sparked by gardening, agriculture, and all things plant-related. With a master's degree in agriculture and more than a decade of experience gardening and tending to my yard, I combine my plant knowledge and a knack for writing to share what I know and love.
See All Articles by Amanda Shiffler


nice article, thanks. i might have to give it a try, would go great in some smoothies
Great info. I’ve been wanting to do some home micro green grows for a while now.
It’s the perfect time to try it!
A lot of information micro greens that is interesting
Will Def take a look into it…
Great read
I would love a chance to add one of your lights to my setup. It would be easy to chain many together with nice light quality
Two questions.
1: what do microgreens tend to sell for per lb.
2: I see days to harvest are running 8-14 depending on segment. How much past that point do they become something other than a microgreen?
Thanks for the comment, Brandon! As for the price, market value is going to vary widely depending upon the area you’re in and the restaurant or retail market you’re selling to. They can go for anything between $25-$80/lb. I wouldn’t make nearly as much selling them in rural Idaho as someone would if they can sell to upscale restaurants in San Francisco or Chicago. Regarding your second question…usually, when microgreens reach 1 to 1.5″ tall and develop a second set of true leaves they are no longer considered a microgreen, and are typically classified as a seedling at that point.
Hope that helps!
I’m really into the idea of local restaurants using microgeeens sourced from local indoor growers.
Me too!
Thanks for the info! A good technical resource here. love your work guys!
Perfect for salads and sandwiches!!!! You can grow these year round and take up no space on a rack system. Cheap and easy way to get fresh harvest year round for a healthy lifestyle.
Great info. Check please, imbonpy here to try and win a light. Micro greens are super cool though
Interesting for sure. I imagine that with your light i would have a better chance of success.
Much better chance of success! 😉
Good stuff! I enjoy microgreens. I would love to try growing under your lights 🙂
Think I’ll try out some microgreens. I have Basil going at the moment and am looking forward to BRANCHING out.
Always good to branch out!
From someone else who ACTUALLY grows micro greens for a restaurant group, this is a great article. Thx chilled.
That’s an amazing compliment, thank you!
Great article!!! Many useful tips just in time! Winter is finally ending here. Thanks!!
ALOT of info here. Great job and keep it up, ChilLED Tech is #1 in the LED game.
Great article and good tips on the micros! Looking forward to trying them out this planting season.
Really awesome info here yall. The how to pick ur greens is spot on information really helped me.not kill a whole little crop. Thanx again chilltech i love the light its aweaone and especially easy DIY build. The x330 x 3 bars is the best cant wait to get the ultra!!!
Excelente post. Mi favorito micro Green son los de rábano, ese sabor picante le agrega un rico toque a todas la ensaladas y emparedados.
Lot of great info on micro greens I also like using for cover crop. No till 👍
I’d like to try one of your lights and see if it’s something that I’d be willing to buy a few more of